Thursday, April 14, 2016

DIY Zelda Wind Waker Pottery


There’s nothing quite like breaking pottery in the Zelda games. The urge throw them or slice them follows me. I see pottery and I just wanna shatter it! If you’re here, maybe you suffer with the same burden.
While walking through the thrift store I came across some little vases. Naturally I wanted to break them but, I purchased them instead. A plan formed in my mind to repaint them and it couldn’t have been simpler. 


You’ll notice I have two pots in the original picture. I’m saving that short fat one for a more involved project that I just haven’t finished yet. It's top secret, but I can tell you it is definitely going to have a million layers of paint by the time I show it off.

What you’ll need:

Vase/pot
Light Blue paint
White paint
Paintbrush

Step 1

Locate your pottery. It doesn’t have to be the perfect size or shape. My vase isn’t quite the right shape but I just decided to go with it.

Step 2

Paint it blue! Trial and error reveals the right blue. I just dumped a glob of blue onto the vase and then added some drops of white to lighten it up. Paint the pot in nice vertical strokes and add as many layers as it takes to fully cover it.


Spoiler alert on that short fat one. :P


Step 3

This is the tricky part and it is really very easy. We need to paint that white squiggle around the pot but we want it to be relatively even. Perfection isn’t necessary of course, but we don’t want to look like we’re in 3rd grade. (Unless you are in third grade, then I’m sure it’s beautiful. And you had better have your parent’s permission to be online.) To achieve even squiggles I put a dot on one side of the pot, then one at an equal height exactly 180 degrees from the first dot. I held my wrist against the counter and spun the pot to add each mark. Then I put dots exactly between those first dots and so on. Depending on the size of your pot will determine how many dots you need. I needed 8 dots.


These dots mark the midline of your squiggles. Pick a dot to be your first dot. Paint up a little ways then come back down on the next dot. Now paint down a little ways and come back up on the next dot. Its like a sine wave people. Once you have that first pass around the pot done you can touch up a bit and add as many layers as it takes to be solid.


Step 4

Let it dry and set it somewhere where everyone can see it! Make sure you let me know how it goes. I’d love to see your little Zelda pottery collection.


Disclaimer: I am not Nintendo and this is just fan art. If having Zelda pottery lures a boy clad in green wielding a legendary sword to your house, I am not liable for the damage he causes. Don’t paint family heirlooms, and don’t go to the thrift store and smash all the glassware. Bad idea.

Tuesday, April 5, 2016

DIY Geeky Keyboard Pen Cup


While wandering the Goodwill store this week I came across a pristine keyboard. It was one of those wireless ones that became separated from that little USB receiver so, it’s pretty much useless now. I bought the thing for 3 bucks and turned it into this fancy dancy little pen cup.
This project is pretty simple and will look totes fantastic sitting on your desk.

What you need:

Old Keyboard
Tin Can (of peaches)
Hot glue gun
Optional – paint

Step 1

Locate yer old keyboard. I chose a black one, but you can use whatever keyboard you want. Maybe use a couple keyboards and mix and match the keys. Pop the keys out. Just a time saving tip – keep them in order otherwise you have to sort through them all. That should be obvious right? Maybe I just like doing things the hard way, but I mixed my keys together and ran my fingers through them like they were pure gold. Bad idea.

On the other hand, I did get to test my skills at remembering where all the keys go. I only messed up 3 keys. Beat that!! 


Depending on the kind of keys will determine the difficulty of getting them off. I couldn’t seem to pop them off the front, so I opened the keyboard up and used some needle nose pliers to pop them out from behind.

Step 2


Now that you’ve got your keys taken care of, you need a can. I used a standard size can of peaches with the easy open lid. This saved me from having that stupid little sharp piece that always happens when using a can opener.
Put all the peaches into a bowl and wash & dry the can. 


BONUS - You now have a tasty snack to munch while you work.

As an optional step, you can paint the can prior to gluing the keys to it. Mine is painted to help hide the gaps in the keys. I didn’t want the shiny tin can showing through, but it is entirely up to you. If you make a mistake and have to pull a key off it will peel the paint. The only thing you can do then is cry. I messed up a couple times and - after my tears dried - I saw that luckily the damage was minimal to the finished product. 


Step 3

Start gluing the keys to the can with the hot glue. Really just pile it onto the back of the key and then hold it onto the can for a few seconds. 


I started with the number keys but, in hindsight, I would have put the F keys along the top. I had room for another row of keys and I think it would have looked better. I wound up having to space my rows out a bit more than I wanted because the can had room for 6 rows of keys. Who knew?


You probably won’t be able to fit all the keys in a row around the can. Just leave out the boring ones. I put the other fun keys along the bottom with the arrow keys.


Tada! That’s all there is to this nifty little project. You are now the proud owner of a geeky pen holder cup thing. Display it with pride.

I would love to see your geekiness at work. Let me know how it turns out!


Disclaimer: I am not trying to force you to eat peaches. For goodness sake, if you would rather have pears (though I don’t know why anyone would want pears) then go right ahead. If you burn your fingers while using the glue gun that isn’t my fault. Maybe you should take a glue gun safety class.  Also, my cup isn’t sponsored by Microsoft. I just really like the Windows key. Remember when Macs used to have an Apple key? Good times.


Friday, March 18, 2016

Painted Plastic Yoshi Eggs for a Geeky Easter

Eggs and Easter just go together. This year I started looking for some special way to decorate eggs without filling my house with that horrendous smell of the Yellowstone Sulfur ponds – hard boiled eggs. As far as I’m concerned, they should be forbidden. However, since I’m not supreme ruler of the world, you can do what you want.


Plastic eggs are a great way to go, in my opinion. I came across these Yoshi eggs from Our Nerd Home and just had to give them a try. The supply list is pretty short and you can get it all at Walmart around Easter for under 5 bucks! That’s pretty good!

Supply List

Plastic Eggs
White spray paint
Acrylic Paint – assorted colors
Paint brushes

You’re also gonna want an outdoor space to spray your plastic eggs.


Step 1

Lay them out on some cardboard or newspaper outside, away from stuff you care about. Add one light coat at a time to prevent running. Unless that’s what you’re into… I didn’t take my own advice and some of the eggs are a bit runny. Whoops. Turns out spray paint takes a bit of skill - and strength. I lack both of those things.
Once the eggs are completely white and dry bring ‘em back inside. If there are any spots you find that got missed you can touch up with some white acrylic paint. 

Step 2

Now you paint on the dots. Obviously you need some original green Yoshi eggs, but Yoshis come in every color so choose your favorites.


Paint 4-6 large dots on the eggs and set them up safely to dry. If you let the acrylic paint dry while the eggs are closed the paint might chip when you open them. It happened to some of mine, so exercise caution.


Step 3

There isn’t really a step 3. Fill your fancy Yoshi eggs up with tasty Easter candy, hide ‘em, throw ‘em at people or just decorate with them. 


Disclaimer: I am not Nintendo. I am not Yoshi and I don’t carry plumbers around on my back. This is fan art. I am not responsible for any children (or adults) that cry when there isn't actually a baby dinosaur inside the eggs. 

Thursday, March 10, 2016

DIY Digitial Geeky Art - Tri Force Edition


This post is like, a marriage of my favorite things. Video games and art. The only way it could be better is if we could eat it when we were done. . .
When it comes to digital art, I dabble.  Come to think of it, I might actually be a dabbler in all aspects of life… I like doing stuff. Cool stuff. But, long about the time it gets hard I mysteriously lose focus.

             Okay, so maybe I’m a bit lazy.

                                                     And cheap…

So, I’m a lazy cheap dabbler. Deal with it.
As such, I take short cuts and use free open source software.

For this project I use 2 free art programs. Gimp and Inkscape.
Gimp is essentially a free Photoshop and you can download it from gimp.org.
Inkscape is comparable to Illustrator and you can get it from inkscape.org.

For the record, I’m using a PC with Windows 7. If you’ve never used these programs before that is totally okay! I’ll walk you through each step in full detail. Let’s do this thing.

Step 1

Assuming you have downloaded and installed both Gimp and Inkscape, go ahead and open them up. See, step one was simple.

Step 2

For our Tri Force we are going to need 3 triangles. Get ready to make some shapes! Woooo! Click the “Create stars and polygons” button. Mine is on the left side of the screen. Along the top of the screen is another little button for the polygon. Click it and change number of Corners to 3.
Go somewhere on your page and hold CTRL while dragging to make a nice equalateral triangle.


Step 3

We need 2 more of these triangles. Use the select arrow on the top left of your tool bar and then press CTRL-d to duplicate the first triangle. It shows up exactly on top of our original triangle. Grab it and drag it down to the left. Repeat the same step on the right.


Step 4

Now we have the base for our fancy digital art. Yay us.
Let’s resize the Tri Force before we switch to Gimp. Select all 3 triangles, grab the little arrow in a corner Press CTRL while you drag to enlarge the picture. Like always you can press CTRL while scrolling to zoom in and out. Use the Width and Height boxes on the top of the screen to resize your Tri Force to somewhere in the 800 pixels range. 
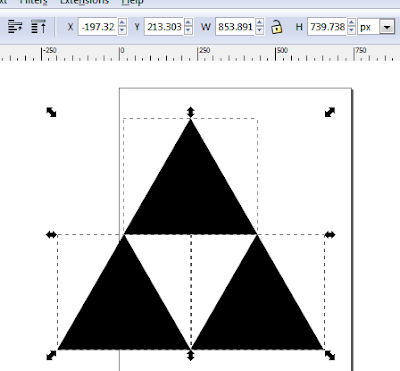
It might not fit your page anymore. Nobody cares.

Step 5

Now that we have the triangles in Inkscape we need a way to move them over to Gimp. To do this we are going to export our triangles as a .png. Select the triangles and go to File>Export Bitmap. Browse for a location to save your file and hit export.


Step 6

Go to your Gimp window. If this is your first time using Gimp it probably opened as several boxes all over the place. “What the heck is that!” your brain probably screamed. Let’s fix it. Find the big window with all the menus on the top. Click the Windows menu and check the Single-Window Mode on the bottom. +50 points to Gryffindor!

Create a new workspace by going to File>New… I set my image size to 1920x1080 because I want to make a cool widescreen wallpaper. Hit OK and you should now see a lovely white piece of digital paper.
To get our Tri Force template we need to go to File>Open as Layers and select our .png of the Tri Force we just made in Inkscape. Once it is opened you should have your Tri Force centered on your white canvas in a separate layer.


Step 7

We now need to find some cool paint brushes. If you look through the default brushes you’ll see lots of boring stuff. We want some high res brush strokes to give our artwork that authentic feel. There are tons of free brushes made by other users available online. I found the ones I’m using on bitbox.com and they seem pretty good. Feel free to use whatever style of brushes you want. Instructions for installing your newly acquired brushes can be found at mygimptutorial.com/how-to-install-gimp-brushes. If you get stuck at any time, go ahead and ask me some questions in the comments section.

Step 9

Now for the fun stuffs. To begin, let’s paint on a new layer. Go over to the right and right click in the Layers window. In the Create a New Layer window set the Layer Fill Type to Transparency and hit OK.
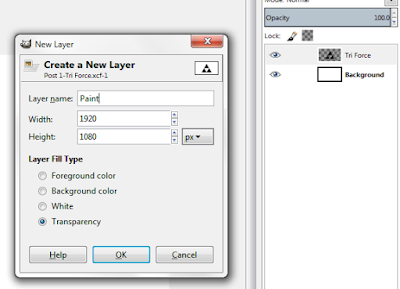
Move the new layer to the center. Just grab and drag.
In the left toolbox find the button that looks like a paint brush. Once you click it you should see the stuff below change. Choose a nice color for your paint. We now need to select which paint stroke we are going to use first.
Click the box next to the word Brush to reveal a drop down of all the brushes. The same menu is also available on the lower right. Pick one that looks enticing. Set the size to around 600-800 px.

Now that you have your brush chosen, move onto the canvas. Make sure you have the Paint layer selected and start stamping. Do not drag the brush (unless you think it looks cool…) and switch as often as you like. If you stamp one that doesn’t really look good just ctrl-z to undo.


Step 10 

We want to paint in the Tri Force now, but we don’t want the new paint going all over the place. To do this click on the tool that looks like someone pointing at Tetris blocks. This is the Select by Color tool. Choose your Tri Force layer and click in a black triangle. You should now see the marching ants around the Tri Force.

Hit Delete. Seriously.

You should still see the dotted outline of the Tri Force. We are now going to paint just inside the phantom triangles. Choose a new color and start painting.


Step 11

I think I want to give my Tri Force wallpaper a bit more of a dark theme. Because reasons.
Make sure you have nothing selected by pressing CTRL-Shift-A and locate the bucket tool. You know, it’s the one you used back in middle school when you made those really cool squiggle paintings and filled in all the shapes. Or was that just me?
Choose a color for the background, select the background layer and fill ‘er in. I chose a dark green.

Step 12

I want to go back now and add some flare to the Tri Force. To do this, select the Tri Force layer, pick the Tetris button again and click OFF the yellow of the Tri Force. You now have everything except the Tri force chosen. Press CTRL-i to invert your selection and you now have the yellow selected. I’m going to touch it up with some highlights and shadows ‘n stuff.
I used the burn/dodge tool to tweak the color a bit on the Tri force and also stamped a few more strokes of green on the paint layer.


Step 13

As some finishing touches I added a layer for a shadow behind the Tri Force. I just picked the soft round brush and turned the opacity way down and painted behind the Tri Force.
I also added a new layer on top of the paint layer but beneath the shadow. This is for an overlay. With the layer selected, change the mode (on the top right) from Normal to Overlay. Turn the Opacity down. Choose the bucket from the left menu and select pattern fill. I used a default Linen pattern to give a canvas texture.


Now it’s ready to export with CTRL-e. I saved mine as a JPG. That’s all there is to it! Set it as your wallpaper, quick!

I hope you enjoyed creating your own piece of geeky art work. The possibilities are pretty endless when it comes to new designs. I had so much fun with this one, I may have to try another.


Disclaimer: I am not Nintendo. I am not Link or Zelda or Gannon. I do not own the Tri Force or any other licensed trademarked stuff. This is fan art. You have my permission to use this fan art for your personal use. Don’t try and sell it. That would be wrong.