This post is like, a marriage of my favorite things. Video games and art. The only way it could be better is if we could eat it when we were done. . .
When it comes to digital art, I dabble. Come to think of it, I might actually be a
dabbler in all aspects of life… I like doing stuff. Cool stuff. But, long about
the time it gets hard I mysteriously lose focus.
Okay, so maybe I’m a bit lazy.
And cheap…
So, I’m a lazy cheap dabbler. Deal with it.
As such, I take short cuts and use free open source
software.
For this project I use 2 free art programs. Gimp and
Inkscape.
Gimp is essentially a free Photoshop and you can download it
from gimp.org.
Inkscape is comparable to Illustrator and you can get it
from inkscape.org.
For the record, I’m using a PC with Windows 7. If you’ve
never used these programs before that is totally okay! I’ll walk you through
each step in full detail. Let’s do this thing.
Step 1
Assuming you have downloaded and installed both Gimp and
Inkscape, go ahead and open them up. See, step one was simple.
Step 2
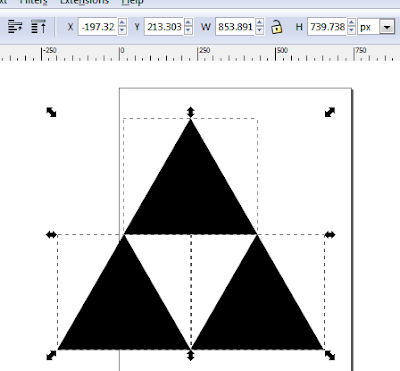
For our Tri Force we are going to need 3 triangles. Get
ready to make some shapes! Woooo! Click the “Create
stars and polygons” button. Mine is on the left side of the screen. Along the
top of the screen is another little button for the polygon. Click it and change
number of Corners to 3.
Go somewhere on your page and
hold CTRL while dragging to make a
nice equalateral triangle.
Step 3
We need 2 more of these triangles. Use the select arrow on the top left of your tool bar and then press
CTRL-d to duplicate the first triangle. It shows up exactly on top of our
original triangle. Grab it and drag it down to the left. Repeat the same step on the right.
Step 4
Now we have the base for our fancy digital art. Yay us.
Let’s resize the Tri Force before we switch to Gimp. Select
all 3 triangles, grab the little arrow in a corner Press CTRL while you drag to enlarge the picture. Like always you can
press CTRL while scrolling to zoom in and out. Use the Width and Height boxes
on the top of the screen to resize your Tri Force to somewhere in the 800
pixels range.
 |
| It might not fit your page anymore. Nobody cares. |
Step 5
Now that we have the triangles in Inkscape we need a way to
move them over to Gimp. To do this we are going to export our triangles as a .png.
Select the triangles and go to File>Export Bitmap. Browse for a location to
save your file and hit export.
Step 6
Go to your Gimp window. If this is your first time using
Gimp it probably opened as several boxes all over the place. “What the heck is
that!” your brain probably screamed. Let’s fix it. Find the big window with all
the menus on the top. Click the Windows
menu and check the Single-Window Mode
on the bottom. +50 points to Gryffindor!
Create a new workspace by going to File>New… I set my
image size to 1920x1080 because I want to make a cool widescreen wallpaper. Hit
OK and you should now see a lovely white piece of digital paper.
To get our Tri Force template we need to go to File>Open
as Layers and select our .png of the Tri Force we just made in Inkscape. Once
it is opened you should have your Tri Force centered on your white canvas in a
separate layer.
Step 7
We now need to find some cool paint brushes. If you look through
the default brushes you’ll see lots of boring stuff. We want some high res
brush strokes to give our artwork that authentic feel. There are tons of free
brushes made by other users available online. I found the ones I’m using on bitbox.com
and they seem pretty good. Feel free to use whatever style of brushes you want.
Instructions for installing your newly acquired brushes can be found at mygimptutorial.com/how-to-install-gimp-brushes.
If you get stuck at any time, go ahead and ask me some questions in the
comments section.
Step 9
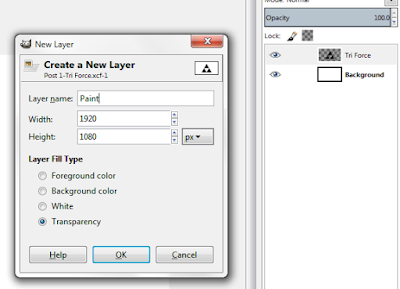
Now for the fun stuffs. To begin, let’s paint on a new
layer. Go over to the right and right click in the Layers window. In the Create
a New Layer window set the Layer Fill Type to Transparency and hit OK.
 |
| Move the new layer to the center. Just grab and drag. |
In the left toolbox find the button that looks like a paint
brush. Once you click it you should see the stuff below change. Choose a nice
color for your paint. We now need to select which paint stroke we are going to
use first.
Click the box next to the
word Brush to reveal a drop down of all the brushes. The same menu is also
available on the lower right. Pick one that looks enticing. Set the size to
around 600-800 px.
Now that you have your brush chosen, move onto the canvas.
Make sure you have the Paint layer selected and start stamping. Do not drag the
brush (unless you think it looks cool…) and switch as often as you like. If you
stamp one that doesn’t really look good just ctrl-z to undo.
Step 10
We want to paint in the Tri Force now, but we don’t want the
new paint going all over the place. To do this click on the tool that looks
like someone pointing at Tetris blocks. This is the Select by Color tool. Choose
your Tri Force layer and click in a black triangle. You should now see the
marching ants around the Tri Force.
Hit Delete. Seriously.
You should still see the dotted outline of the Tri Force. We
are now going to paint just inside the phantom triangles. Choose a new color
and start painting.
Step 11
I think I want to give my Tri Force wallpaper a bit more of
a dark theme. Because reasons.
Make sure you have nothing selected by pressing CTRL-Shift-A
and locate the bucket tool. You know, it’s the one you used back in middle school
when you made those really cool squiggle paintings and filled in all the shapes.
Or was that just me?
Choose a color for the background, select the background
layer and fill ‘er in. I chose a dark green.
Step 12
I want to go back now and add some flare to the Tri Force.
To do this, select the Tri Force layer, pick the Tetris button again and click
OFF the yellow of the Tri Force. You now have everything except the Tri force
chosen. Press CTRL-i to invert your selection and you now have the yellow
selected. I’m going to touch it up with some highlights and shadows ‘n stuff.
I used the burn/dodge tool to tweak the color a bit on the
Tri force and also stamped a few more strokes of green on the paint layer.
Step 13
As some finishing touches I added a layer for a shadow
behind the Tri Force. I just picked the soft round brush and turned the opacity
way down and painted behind the Tri Force.
I also added a new layer on top of the paint layer but
beneath the shadow. This is for an overlay. With the layer selected, change the
mode (on the top right) from Normal to Overlay. Turn the Opacity down. Choose
the bucket from the left menu and select pattern fill. I used a default Linen
pattern to give a canvas texture.
Now it’s ready to export with CTRL-e. I saved mine as a JPG.
That’s all there is to it! Set it as your wallpaper, quick!
I hope you enjoyed creating your own piece of geeky art work.
The possibilities are pretty endless when it comes to new designs. I had so
much fun with this one, I may have to try another.
Disclaimer: I am not Nintendo. I am not Link or Zelda or
Gannon. I do not own the Tri Force or any other licensed trademarked stuff.
This is fan art. You have my permission to use this fan art for your personal
use. Don’t try and sell it. That would be wrong.


No comments:
Post a Comment